
Hey all …! Before we dive into the biggest Salesforce 50th release – Summer’16 features, let me thank Mike Gerholdt and LeeAnne Templeman for awesome admin webinars they do with every salesforce release. Actually, I’m not a blogger. But I started blogging with my first post based on the Awesome Admin take over Spring’16 video. So, I’m here again with Summer’16 preview admin features.
Get a Pre-Release org for yourself:
- Go and grab a pre-release org if you don’t have one for yourself for checking awesome brand new features, not only for this release but you can check for every upcoming releases as well, cool 😀 .
- Sign up here to get a Summer’16 pre-release org and mark your credentials for coming further releases.
- Don’t forget to join the Release Readiness & Feature Adoption group in Success Community managing by Samanthia Achuff. Always stay up to date on every release features, mark the key dates and join the live events
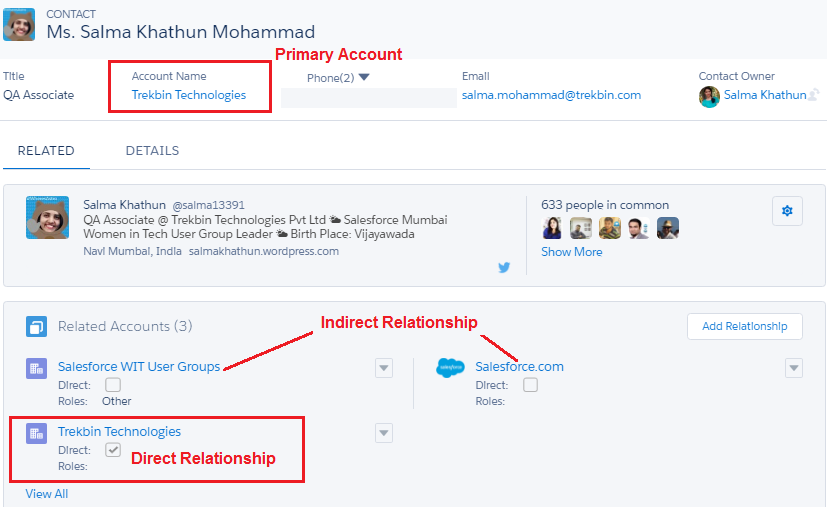
Contact with Multiple Accounts:
- Salesforce is finally releasing the Shared Contacts feature in this release after having 63,730 Idea Exchange points.
- Contacts with Multiple Accounts, lets your sales reps easily manage the relationships between people and businesses without creating duplicate records
- Every contact needs to be associated with a Primary account (the account that appears in Account Name on the Contact).
- The primary account represents a direct relationship; the other accounts associated with a contact represent indirect relationships
- How you can see this feature ? Go to Account Settings in Setup and click the “Allow users to relate a contact to multiple accounts” checkbox and save.
- This feature is available in Lightning Experience, Salesforce Classic, and all versions of the Salesforce1 mobile app.

Create a Calendar from Anything:
- Do you and your users want an easy, visual way to track upcoming or ongoing campaigns? Support cases? Retail store events? Opportunities due to close?
- Create a calendar from a standard or custom object by choosing a date or date/time field representing data they want to track.
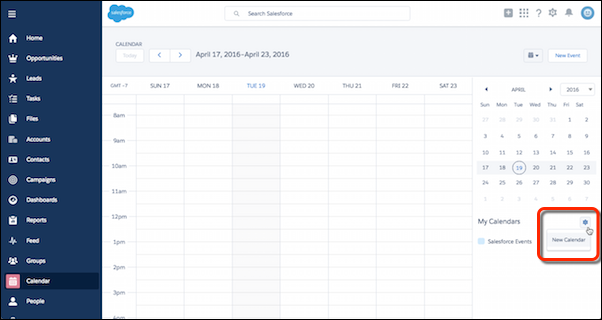
- Follow the below steps to create a new calendar.
- Click on’New Calendar’
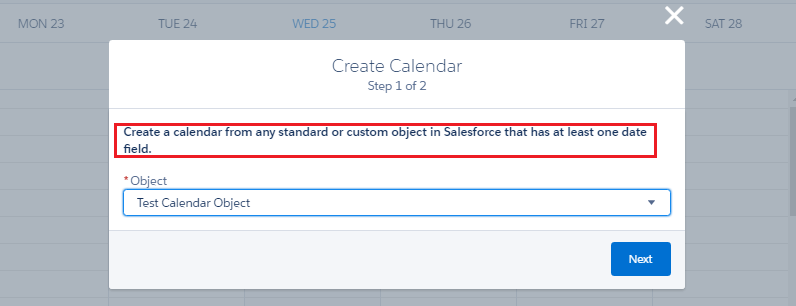
- Select any Standard or Custom object with having at least one Date field
- Give a name to your calendar
- You have to select ‘Field for Start’ and ‘Field for End’. If you select Date field in ‘Field for Start’ then all Date/Time fields are grayed in the ‘Field for End’
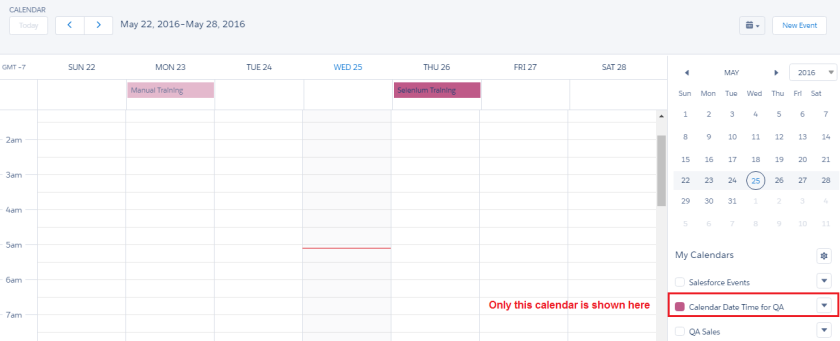
- Filter your data to be displayed on the calendar by selecting a list view you have defined for the object
- Select the field to represent the items on the calendar
- This feature is available in Lightning Experience only.

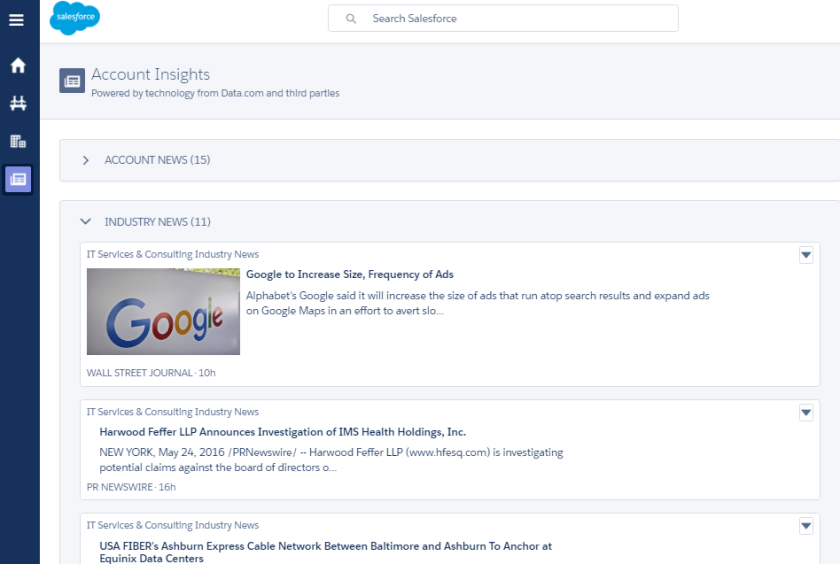
Find All News with One Click:
- The News app is a one-stop shop where your users can quickly catch up on the latest happenings about the companies and industries that matter most to them
- News will be displayed based on recently viewed accounts and opportunities, and on tasks and events for those accounts—which is the same criteria used to select insights for the Lightning Home page.
- But, unlike the Home page, the News app is all news, all the time.
- This feature is available in Lightning Experience and all versions of the Salesforce1 app.
Create New Accounts Lightning Fast with Account Autofill:
- When reps start typing a company in the Account Name field, we’ll offer up suggestions based on text entered
- When a rep selects a company from the list, salesforce auto-fill several other fields with data, like Website, Phone, Ticker Symbol and Billing Address (headquarter location).
- The suggestions include US-based companies. All these are coming from Data.com
- This feature is available in Lightning Experience only.
- How you see this feature in action? Go to Setup > Account Settings and check the ‘Enable Account Autofill’

Visualize Your Business Like Never Before with Account Logos (Beta):
- From Account Settings, select the option to allow logos.
 Check the ‘Enable Account Logos’
 - Logos show up automatically, when available, on US-based accounts based on Data.com.
- If you use Social Accounts, logos that reps added manually from social networks may be replaced with a fresher, more up-to-date logo
- If you’re not completely satisfied with a logo, for any reason, contact Salesforce Customer Support to remove the logo from the account.
- This feature is available in Lightning Experience and all versions of the Salesforce1 app.
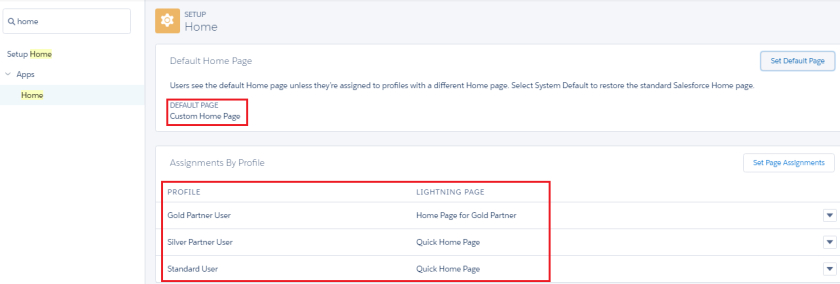
Set Custom Home Pages:
- You can set the default home page in two places.
- Lightning App Builder—From Setup, enter Lightning App Builder in the Quick Find box, then select Lightning App Builder.
After you save a page, click Activate from the Page Saved dialog, or click Activation later.
- Home in Setup—From Setup, enter Home in the Quick Find box, then select Home.
- Lightning App Builder—From Setup, enter Lightning App Builder in the Quick Find box, then select Lightning App Builder.
- All users see the default Home page unless they have profiles that are assigned to another Home page.
Assign Custom Home Pages by Profile:
- You can set page assignments by profile in 2 places.
- Lightning App Builder—From Setup, enter Lightning App Builder in the Quick Find box, then select Lightning App Builder. After you save a page, click Activate from the Page Saved dialog, or click Activation and select Assign this Home page to specific profiles.
- Home in Setup—From Setup, enter Home in the Quick Find box, then select Home. Then click Set Page Assignments. You can also click
 next to a profile and select Change Assignment.
- You can use the Lightning App Builder to assign profiles to a single Home page, but Home in Setup offers more control over page assignments.
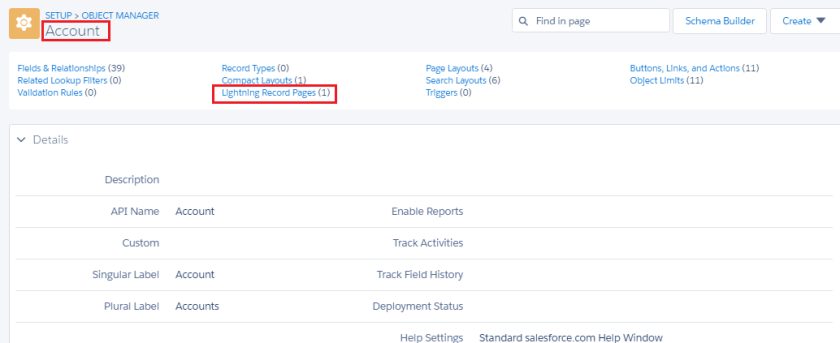
Create or Edit Lightning Experience Record Pages:
- Create a record page from scratch, or make a copy of an existing record page right from the Setup menu.
- Give your users a customized view for each object’s records by adding, editing, or removing components to change the page’s layout.
- We added a Lightning Record Pages related list to all objects that support record page editing in the Lightning App Builder. You can see all the custom record pages you’ve created for that object and which record page is active.
- This feature is available in Lightning Experience only.

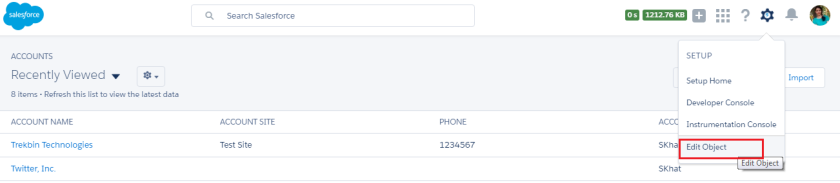
Edit Objects Directly from the Setup Menu:
- On object home and record pages, you can select Edit Object from the Setup menu to go directly to that object’s detail page.
- This feature is available in Lightning Experience only.
Note: The Edit Object menu option is available only for objects that are listed in the Object Manager in Lightning Experience.
Power of Flows in LEX and SF1 (Pilot) :
- You can now add flows to any Lightning page–App pages, Record pages, and Home pages alike.

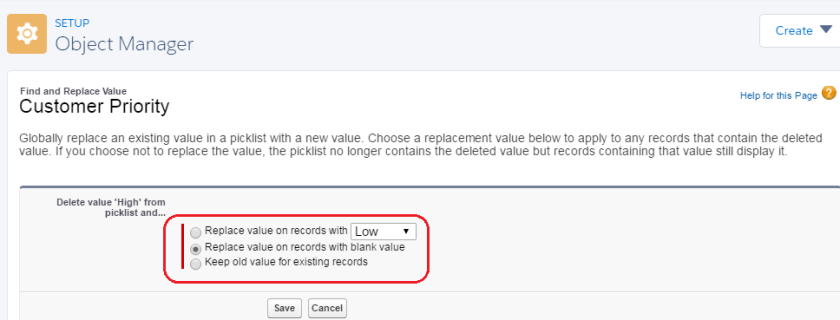
Remove a Picklist Field Value from Records:
- An easy way to remove a picklist value from all records in your org. Select any 3 options display while removing value.
- This process works for standard and custom picklists (restricted or unrestricted).
- One shot – all your records of the object are updated 😀
- This feature is available in both Lightning Experience and Salesforce Classic.
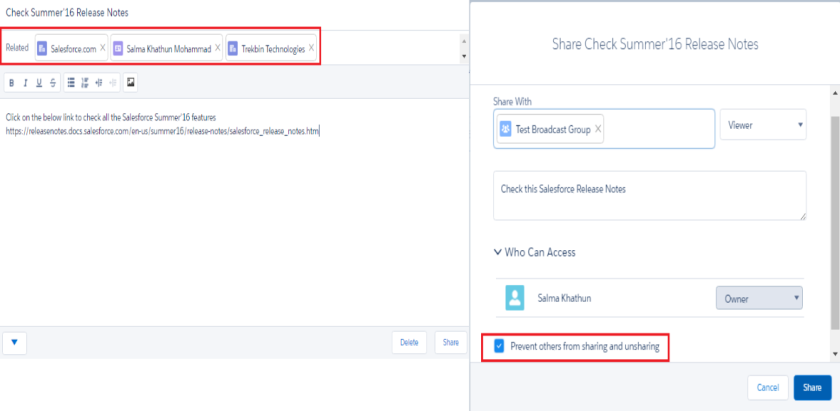
Share Notes with Other Users or Groups:
- How you will see this effect in org ?

- Sales users can now collaborate more easily by sharing notes with their teammates or Chatter groups.
- Recipients of a shared note can view notes but not edit them. Also recipients will receive an email of shared note.
- This feature is available in both Lightning Experience and Salesforce Classic.
Automatically Get Geocodes for Addresses:
- Geocodes identify a location using latitude and longitude.
- You can set up and activate the geocode clean rules for your org. You can set up geocode clean rules in Salesforce Classic only
- Geocodes are added to the pre-existing latitude and longitude fields on accounts, contacts, and leads.
- By default, these fields aren’t visible on records, but you can check them out in a few ways, including using custom formula fields and querying the Salesforce API.
Note: Person accounts are not supported

Processes Can Execute Actions on More Than One Criteria:
- Now you can choose what happens after your process executes a specific action group. Should the process stop, or should it continue evaluating the next criteria in the process? It’s up to you!

Salesforce1 Features
Quickly See If Related Lists Include Records:
- The mobile app now includes an easy-to-read counter for each related list on a record’s Related page.

Copy and Paste Text on Record Detail Pages:
- Salesforce1 now includes support for the standard
Android and iOS copy, cut, and paste gestures when viewing, creating, and editing record details - For example, a sales rep can copy field values from an account detail page and paste the values to fields when editing a contact or creating an opportunity. Pasting copied data is supported on edit pages and when using create and update quick actions
Get Account Insights on Opportunities:

- Sales reps can see the latest breaking news about their accounts when viewing opportunity records.
- Insights are based on the account that’s associated with the opportunity and are selected using the same criteria as for selecting insights for accounts.
Change a Record’s Owner:
- Salesforce1 users can now
 change record owners for accounts, campaigns, cases, cont
acts, leads, opportunities, work orders, and custom objects. - The new Change Owner action, accessible from the action bar, is available in all versions of the Salesforce1 mobile app.
- The Change Owner action appears only if the user has permission to change record ownership.
Team Up on Accounts:
-
Tap the Account Team card to get
 detailed information about the
team’s members, add coworkers to the team, or add the record owner’s default account team. -
Tap a team member’s name to change their role or adjust their access level, or remove the member from the team.
