
What is Authentication ?
 Authentication is how you prove to a system who you are to gain access. That mean, you can get into system, a valid users can get in but not the bad guy.
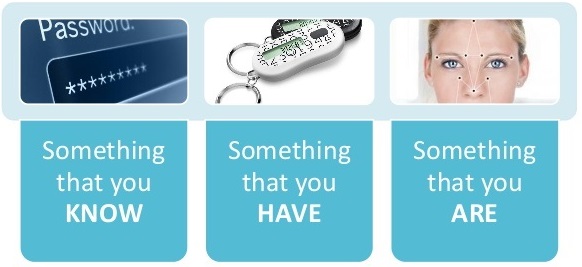
- This is made up of something you KNOW. That is something you have to remember.
Ex: Pin number or Password. - Or something you HAVE. That is something unique in your possession.
Ex: ATM card or Mobile phone. - Or something you ARE. That is bio-metrics.
Ex: Retina scan or Finger print.
Risk Based Authentication in Salesforce:
- If any user tries to login in to the Salesforce org from an ODD device or browser, then verification code is sent via as Email or Mobile message. Salesforce platform always perform what’s known as risk based authentication.
- When users login, salesforce analyze those logins, looking at their network location and whether or not we have seen their browser before.
- One time passwords are set via email or text message when salesforce do not recognize the user’s network or browser.
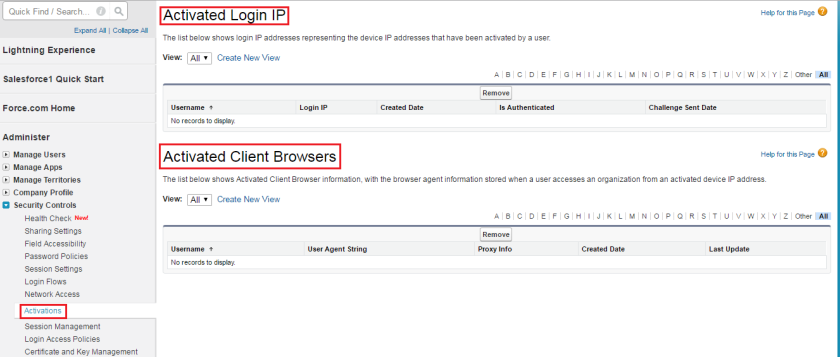
- We can view or adjust this information by browsing the Setup, Security Controls, Activations.
- There you can see users activated networks and their activated browsers.
- You can even delete them or remove them from the system
 In addition, you can provide input into a risk based authentication by setting up Trusted networks via Setup, Security Controls, Network Access or via profile based IP restrictions. Check here if you are new to setting Trusted IP Ranges
Two Factor Authentication:
- Combining any two of the three types of authentication is called Two Factor Authentication.
Ex: password + phone authenticator app - Two factor authentication adds another layer of security by making you type in a second temporary password.
- Also, it builds on the top of risk based authentication and introduces a few key capabilities
- The first are applications for mobile devices that are allowed to generate those OTPs (One Time Passwords)
- No longer there is dependency on email or SMS. You can generate one time password directly from an app on your phone.
Setting Up Two-Factor Authentication:
- As a Admin, you need to make all employees supply more than their username and password every time they try to access the your Salesforce org.
- Best practice is to create Permission Sets for those users you want to set up 2FA for every time they login. Check the Permissions Sets if you are very new to this topic.
- Typically, you create a permission set for a group of users. But for this example, we set up for one user
- Log in again as the system administrator of your DE org.
- From Setup, enter Permission in the Quick Find box, then select Permission Sets.
- Click New.
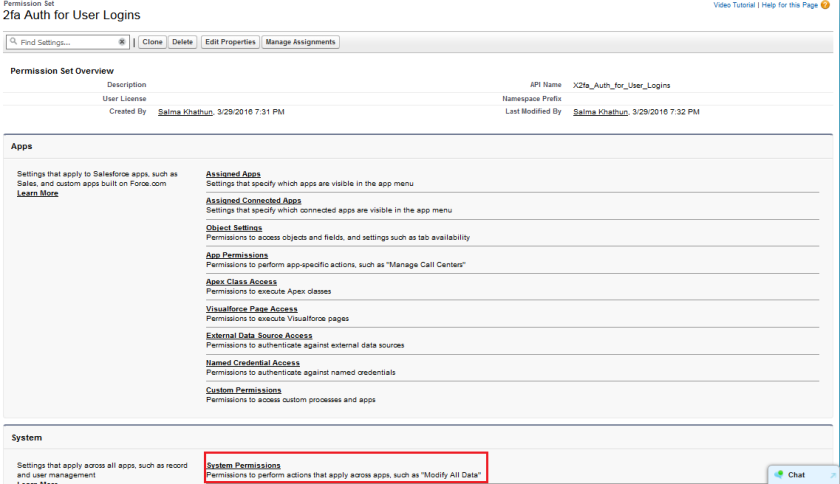
- Label the permission “2fa Auth for User Logins”.
- Click Save.
- Under System, click System Permissions. Now you’re on the detail page for the 2fa Auth for User Logins permission set.
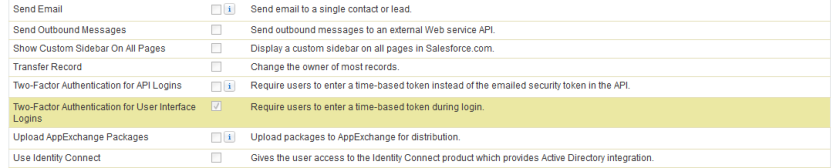
- Click Edit.
- Select Two-Factor Authentication for User Interface Logins.
- Click Save.
- Now, we have to assign the newly created Permission Set to the user we have to set up 2FA. If you’re not on the detail page for your new permission set, navigate back there.
- On the detail page of the new permission set, click Manage Assignments.
- Click Add Assignments. On the list of users, select the check box next to user’s account. (If you wanted, you could assign up to 1,000 users at a time.)
- Click Assign

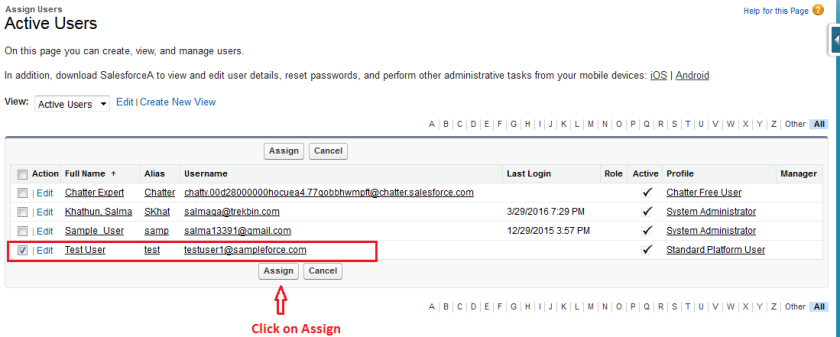
- Now when the ‘Test User’ login to the Salesforce org, he/she will be prompted with Two Factor Authentication.
Connect the Salesforce Authenticator Mobile App to a User Account:
- Login as ‘Test User’ now by providing basic Single Factor Authentication, that is Username and Password.
- You will redirect Email/Mobile SMS screen for the Risk Based Authentication (user is logging to salesforce for first time on that device/browser), if salesforce doesn’t recognize your device.
- After providing the correct Verification Code, you will be prompted with the below screen for Two Factor Authentication

- As displayed in above screen, we have to first install the ‘Salesforce Authenticator’ app from App Store or Google Play in mobile device
- Once you have installed successfully the Salesforce Authenticator app in your mobile, you can get the verification code in 2 different methods:
- Get a Two-Word Phrase and click on Connect
- Get a QR Code or manually entering a key
Get a Two-Word Phrase:
- Alright! We are there now. Open the ‘Salesforce Authenticator’ app in your mobile device.
- You’ll see a + icon with message as Let’s get started! Connect your personal and work accounts to Authenticator.
- Tap on the + icon

- You’ll now see a Two-Word Phrase as below:

- Now enter the two-word phrase “actual chamber” as displayed in the ‘Desktop: Connect Salesforce Authenticator‘ screen above and click on the Connect
Get a verification code by scanning QR Code:
- Salesforce has another alternative method for 2FA by scanning your QR Code displayed on the screen.
- HOLD ON !!!! If you’re already logged in as ‘Test User’ successfully in salesforce org.
- Before going to below process, let’s Logout as ‘Test User’
- Again try to login as ‘Test User’ in your desktop. Provide Username & Password and provide verification code if salesforce doesn’t recognize your device or network location (Risk Based Authentication)
- Whew!! Again you’re there at ‘Desktop: Connect Salesforce Authenticator‘ screen
- This time click on ‘Choose Another Verification Method’ link
- You’ll be redirected to the below page. Choose ‘Use Verification codes from an authenticator app‘ and click on Continue.

- Now, you will be redirected to the below page for scanning the QR Code from mobile authenticator app

- So, open the ‘Salesforce Authenticator’ app in your mobile device.
- You’ll see a + icon with message as Let’s get started! Connect your personal and work accounts to Authenticator.
- Do not tap on the + icon
- This time you observe another option below as ‘Or Scan QR Code‘. See the ‘Mobile: Two Word Phrase Screen‘ page
- Tap on the ‘Or Scan QR Code’. App ask for the use of camera for scanning the QR Code, click Allow
- You’ll be seeing the screen as below with red square box as below:

- That’s it ! Scan the QR code display in desktop with your Authenticator App
- Salesforce Authenticator app will generate a 6 digit code as below for the ‘Test User’. Now take a zoom at the green circle displays next to code. This code only activates for 30 seconds. For every 30 seconds Salesforce Authenticator app generates a new and unique verification code, isn’t that Cool !
Get a verification code by manually entering key:
- Okay. Sometimes you don’t want allow your camera for scanning the QR code. In that case, again, salesforce has another alternative 🙂
- This time you can enter a key displayed on the Salesforce Authenticator app
- If you’re already logged in as ‘Test User’ successfully in salesforce org.
- Before going to below process, let’s Logout as ‘Test User’
- Again try to login as ‘Test User’ in your desktop. Provide Username & Password and provide verification code if salesforce doesn’t recognize your device or network location (Risk Based Authentication)
- Whew!! Again you’re there at ‘Desktop: Connect Salesforce Authenticator‘ screen
- This time click on ‘Choose Another Verification Method’ link
- Choose ‘Use Verification codes from an authenticator app‘ and click on Continue.
- Now you will be redirected to the ‘Desktop: QR Code Page‘ page for scanning the QR Code from mobile authenticator app
- Click on the ‘I can’t scan the QR Code link‘ below. You will be navigated to the below page with the Key.

- So, open the ‘Salesforce Authenticator’ app in your mobile device (Imagine your mobile doesn’t the scanning QR Code process)
- You’ll see a screen as below. Tap on the ‘Add Your First Key‘ button

- A pop-up will display for selecting process for adding an account as below. Tap on ‘Manually Add Account‘

- Provide the Username and Key displayed in the above screen.

- Tap on the Submit button. Whew!! You got the verification code now

Set up Authentication Level based on policies:
- Salesforce identity doesn’t require to enforce Two Factor Authentication only on Login. It can also do this dynamically based on your Session Level.
- Firstly, navigate to Session Settings. You can see that we have new level called ‘Session Security Levels‘

- There are 2 session levels within Salesforce, one is Standard Assurance and other is High Assurance sessions.
- Using this session levels we can set fine green policies for accessing Applications or access to Reports and Dashboards.
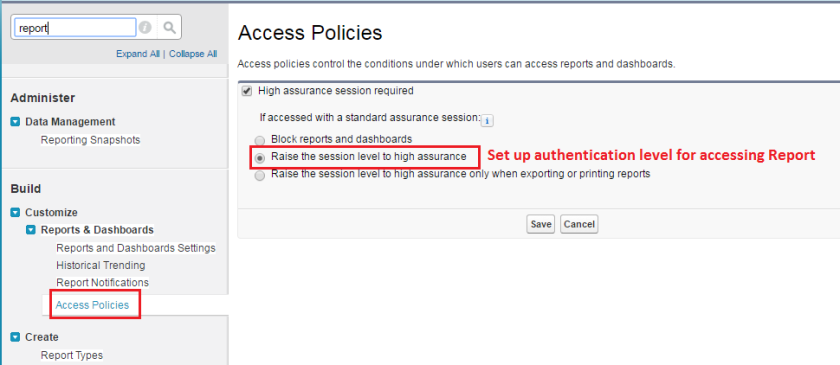
- For example, you require a High Assurance session level is used to access Reports
- To set this navigate to Setup > Customize > Reports & Dashboards > Access Policies
- Click on ‘High assurance session is required’ and select the ‘Raise the session level to high assurance’
- Click on Save
Access Reports with user having Standard Assurance Level:
- Login into salesforce org as Admin.
- Now, remove the ‘Test User’ from the “2fa Auth for User Logins” Permission Sets created above for Two Factor Authentication.
- To do this, navigate to Setup > Manage Users > Permission Sets
- Click on the “2fa Auth for User Logins” Permission Sets
- Click on the ‘Manage Assignments’ button
- Select the ‘Test User’ and click on ‘Remove Assignment’


- At this point of time, ‘Test User’ is having only Standard Assurance Level that is Username and Password.
- Now login as ‘Test User’ by giving Username and Password.
- On successful login, ‘Test User’ is redirected to salesforce org.
- Okay !! It’s time to click on ‘Reports’ tab
- You have to redirected to High Level Assurance page, woohoo!

- Come On !! Open the Salesforce Authenticator app in your mobile and grab the time based token and paste in the verification code box here
- Click on Verify button. That’s it! you are able to access the Reports and Dashboards now 🙂
References:
1. Securing Your Users’ Identity Trailhead
2. Ensuring Security with Two Factor Authentication Video

Nice Article
LikeLiked by 1 person
Nice Article , I am currently testing the two factor authentication using Yubico Key – more details are here https://www.yubico.com/applications/salesforce/
LikeLike
Great article! I’d also add that you can also setup your own second factor auth via login flows. Good if you want to use eg a Yubikey or have your own internal auth system.
LikeLike
What about if i don’t have this Salesforce app in my mobile? Any other way to do this without mobile application in salesforce?
LikeLiked by 1 person
Yes see my post above. You can use a Yubikey with a Salesforce login flow: http://www.radnip.com/login-flows-with-yubikey-second-factor-auth/
LikeLike
As far as I know, if an Admin is set 2FA for you, then you have to be Salesforce mobile app for generating verification code. It’s just like your OTP used for online banking. But for testing purpose, you can use Google Mobile Emulator. Best Emulators for PC
Recently, one of my colleague faced problem this 2FA while logging into DE org. In this case, she is only the admin and she is not able to generate Verification Code. Finally thanks to Salesforce Support for resetting it, you can check here http://sforce.co/1OjZu6N
LikeLike